Drop Down MenusCSS Drop Down MenuPure CSS Dropdown Menu

Tuesday 30 December 2014

How to Modifying the Size of Redo Logs


To change the size of your redo logs, you must drop them and then re-create them. You can do this online without shutting down the database.
Steps:
1. Make sure the logfile you wish to change is not the current or Active logfile.
2. Drop the logfile group you wish to change.
3. Re-create the logfile group, resizing it as required.

SQL> select group#, status from v$log;
    GROUP# STATUS
---------- ----------------
         1 INACTIVE
         2 INACTIVE
         3 CURRENT

Suppose as per the above case, we want to replace log group 3, which is CURRENT so we need to make it INACTIVE first. To do this we need to force log switch wait for the archive generated.

SQL> Alter system switch logfile;
A CURRENT status indicates that the resulting dirty block that are associated with the redo in the logfile have not yet been check pointed which is required before we drop the logfile.

SQL> Alter system switch logfile;
Checkpoint the system. This will remove the log file we want to drop from a possible active status.

Alter system checkpoint;
Now check the status of logfile again the status of group 3 is 'INACTIVE' now

SQL> select group#, status from v$log;
    GROUP# STATUS
---------- ----------------
         1 CURRENT
         2 INACTIVE
         3 INACTIVE

Once the checkpoint is complete, we drop the online redo log group, and re-create it defining a new size for the redo log files.
Note that we use the REUSE keyword also to indicate that we are reusing the files that already exist there and Oracle will resize them accordingly.

SQL> Alter database drop logfile group 3;
Now, add the logfile group with the new sizing information.

SQL> alter database add logfile group 3
  ('D:\ORACLE9I\ORADATA\ORAC\redo03a.log',
   'D:\ORACLE9I\ORADATA\ORAC\redo03b.log') size 100m REUSE;


Tuesday 23 December 2014

Starting your Oracle Database

Starting your Oracle Database

One of the most common jobs of the database administrator is to startup or shutdown the Oracle database. Typically we hope that database shutdowns will be infrequent for a number of reasons:
* Inconvenience to the user community.
* Anytime you cycle the database, there is a risk that it will not restart.
* Starting your Oracle database flushes the Oracle memory areas, such as the database buffer cache.
Performance on a restarted database will generally be slow until the database memory areas are ?warmed? up.
Why would you shutdown your database? Some reasons include database maintenance:
* Applying a patch or an upgrade.
* Allow for certain types of application maintenance.
* Performing a cold (offline) backup of your database. (We recommend hot backups that allow you to avoid shutting down your database)
* An existing bug in your Oracle software requires you to restart the database on a regular basis.
When the time comes to "bounce" the database (using the shutdown and startup commands), you will use SQL*Plus to issue these commands.   Let's look at each of these commands in more detail.

The Oracle Startup Command

You start the Oracle database with the startup command. You must first be logged into an account that has sysdba or sysoper privileges such as the SYS account . Here is an example of a DBA connecting to his database and starting the instance:
C:\Documents and Settings\Najaf>set oracle_sid=booktst
C:\Documents and Settings\Najaf>sqlplus "sys as sysdba"
 
SQL*Plus: Release 10.1.0.2.0 - Production on Mon Feb 21 12:35:48
 
Enter password: xxxx
Connected to an idle instance.
 
SQL> startup
ORACLE instance started.
 
Total System Global Area  251658240 bytes
Fixed Size                   788368 bytes
Variable Size             145750128 bytes
Database Buffers          104857600 bytes
Redo Buffers                 262144 bytes
Database mounted.
Database opened.
In this example from a Windows XP server, we set the ORACLE_SID to the name of the database and we log into SQL*Plus using the "sys as sysdba" login. This gives us the privileges we need to be able to startup the database. Finally, after we enter our password, we issue the startup command to startup the database. Oracle displays its progress as it opens the database, and then returns us to the SQL*Plus prompt once the startup has been completed.
When Oracle is trying to open your database, it goes through three distinct stages, and each of these is listed in the startup output listed previously. These stages are:
* Startup (nomount)
* Mount
* Open
Let's look at these stages in a bit more detail.

The Startup (nomount) Stage

When you issue the startup command, the first thing the database will do is enter the nomount stage. During the nomount stage, Oracle first opens and reads the initialization parameter file (init.ora/spfile.ora) to see how the database is configured. For example, the sizes of all of the memory areas in Oracle are defined within the parameter file.
After the parameter file is accessed, the memory areas associated with the database instance are allocated. Also, during the nomount stage, the Oracle background processes are started. Together, we call these processes and the associated allocated memory the Oracle instance. Once the instance has started successfully, the database is considered to be in the nomount stage. If you issue the startup command, then Oracle will automatically move onto the next stage of the startup, the mount stage.

Starting the Oracle Instance (Nomount Stage)

There are some types of Oracle recovery operations that require the database to be in nomount stage. When this is the case, you need to issue a special startup command: startup nomount, as seen in this example:
SQL> startup nomount

The Mount Stage

When the startup command enters the mount stage, it opens and reads the control file. The control file is a binary file that tracks important database information, such as the location of the database datafiles.
In the mount stage, Oracle determines the location of the datafiles, but does not yet open them. Once the datafile locations have been identified, the database is ready to be opened.

Mounting the Database

Some forms of recovery require that the database be opened in mount stage. To put the database in mount stage, use the startup mount command as seen here:
SQL> startup mount
If you have already started the database instance with the startup nomount command, you might change it from the nomount to mount startup stage using the alter database command:
SQL> alter database mount;

The Open Oracle startup Stage

The last startup step for an Oracle database is the open stage. When Oracle opens the database, it accesses all of the datafiles associated with the database. Once it has accessed the database datafiles, Oracle makes sure that all of the database datafiles are consistent.

Opening the Oracle Database

To open the database, you can just use the startup command as seen in this example
SQL> startup
If the database is mounted, you can open it with the alter database open command as seen in this example:
SQL> alter database open;

Opening the Database in Restricted Mode

You can also start the database in restricted mode. Restricted mode will only allow users with special privileges to access the database (typically DBA's), even though the database is technically open. We use the startup restrict command to open the database in restricted mode as seen in this example.
SQL> startup restrict
You can take the database in and out of restricted mode with the alter database command as seen in this example:
-- Put the database in restricted session mode.
SQL> alter system enable restricted session;
-- Take the database out of restricted session mode.
SQL> alter system disable restricted session;
Note:  Any users connected to the Oracle instance when going into restricted mode will remain connected; they must be manually disconnected from the database by exiting gracefully or by the DBA with the "alter system kill session" command.

Problems during Oracle Startup

The typical DBA life is like that of an airline pilot, "Long moments of boredom followed by small moments of sheer terror", and one place for sheer terror is an error during a database startup.
The most typical reason for a database not starting up is a prior database crash, a data corruption, disk failure or some other catastrophic event from which the database cannot recover. In these cases, you have to go into database recovery mode to start your instance.

Startup Database At Restricted Mode.

We can start the database in restricted mode. Restricted mode will only allow users with special privileges to access the database (typically DBA’s), even though the database is technically open. 
We use the startup restrict command to open the database in restricted mode as seen in this example.


 DB INSTACNE STATUS:- 

INSTANCE_NAME    HOST_NAME            STARTUP_T STATUS       ARCHIVE INSTANCE_ROLE      DATABASE_STATUS   LOGINS
---------------- -------------------- --------- ------------ ------- ------------------ ----------------- ----------
najaf            NAJAFS               23-DEC-14 OPEN         STARTED PRIMARY_INSTANCE   ACTIVE         ALLOWED


Enable the restricted mode- Method 1-
 
SQL> shut immediate;
Database closed.
Database dismounted.
ORACLE instance shut down.


SQL> startup restrict;
ORACLE instance started.

Total System Global Area 1686925312 bytes
Fixed Size                  2176368 bytes
Variable Size            1090521744 bytes
Database Buffers          587202560 bytes
Redo Buffers                7024640 bytes
Database mounted.
Database opened.
SQL>
SQL> select instance_name,host_name,startup_time,status,archiver,instance_role,database_status,logins from v$instance;

INSTANCE_NAME    HOST_NAME            STARTUP_T STATUS       ARCHIVE INSTANCE_ROLE      DATABASE_STATUS   LOGINS
---------------- -------------------- --------- ------------ ------- ------------------ ----------------- ----------
najaf            NAJAFS               24-DEC-14 OPEN         STARTED PRIMARY_INSTANCE   ACTIVE         RESTRICTED


Disable the restricted mode - Method-1-
 
SQL> shut immediate;
Database closed.
Database dismounted.
ORACLE instance shut down.


SQL> startup
ORACLE instance started.

Total System Global Area 1686925312 bytes
Fixed Size                  2176368 bytes
Variable Size            1090521744 bytes
Database Buffers          587202560 bytes
Redo Buffers                7024640 bytes
Database mounted.
Database opened.
SQL>
SQL> select instance_name,host_name,startup_time,status,archiver,instance_role,database_status,logins from v$instance;

INSTANCE_NAME    HOST_NAME            STARTUP_T STATUS       ARCHIVE INSTANCE_ROLE      DATABASE_STATUS   LOGINS
---------------- -------------------- --------- ------------ ------- ------------------ ----------------- ----------
najaf            NAJAFS               24-DEC-14 OPEN         STARTED PRIMARY_INSTANCE   ACTIVE         ALLOWED


Enable the restricted mode - Method 2-
 
SQL> alter system enable restricted session;

System altered.

SQL> select instance_name,host_name,startup_time,status,archiver,instance_role,database_status,logins from v$instance;

INSTANCE_NAME    HOST_NAME            STARTUP_T STATUS       ARCHIVE INSTANCE_ROLE      DATABASE_STATUS   LOGINS
---------------- -------------------- --------- ------------ ------- ------------------ ----------------- ----------
najaf            NAJAFS               24-DEC-14 OPEN         STARTED PRIMARY_INSTANCE   ACTIVE         RESTRICTED


Disable the restricted mode- Method 2- 
 
SQL> alter system disable restricted session;

System altered.

SQL> select instance_name,host_name,startup_time,status,archiver,instance_role,database_status,logins from v$instance;

INSTANCE_NAME    HOST_NAME            STARTUP_T STATUS       ARCHIVE INSTANCE_ROLE      DATABASE_STATUS   LOGINS
---------------- -------------------- --------- ------------ ------- ------------------ ----------------- ----------
najaf            NAJAFS               24-DEC-14 OPEN         STARTED PRIMARY_INSTANCE   ACTIVE         ALLOWED
 

Tuesday 16 December 2014

JOINS , VIEWS and MATERIALIZED VIEW


SUPPLIER TABLE-

SQL> create table suppliers (supplier_id int,supplier_name varchar2(20));

Table created.

SQL> alter table suppliers add constraint pk_constraint_supplier primary key (supplier_id);

Table altered.


SQL> insert into suppliers values(&supplier_id,'&supplier_name');


SQL> SELECT * FROM SUPPLIERS;
SUPPLIER_ID SUPPLIER_NAME
----------- --------------------
      10000 IBM
      10001 Hewlett Packard
      10002 Microsoft
      10003 NVIDIA


ORDER TABLE-

SQL> create table orders (order_id int, supplier_id int, order_date date);

Table created.


SQL> alter table orders add constraint fk_constraint_order foreign key (supplier_id) references suppliers(supplier_id);

Table altered.


SQL> insert into orders values(&order_id,&supplier_id,TO_DATE('&date','yyyy/mm/dd'));

SQL> alter table orders disable constraint FK_CONSTRAINT_ORDER;

Table altered.


SQL> SELECT * FROM ORDERS;
  ORDER_ID SUPPLIER_ID ORDER_DAT
---------- ----------- ---------
    500125       10000 12-MAY-03
    500126       10001 13-MAY-03
    200127       10004 14-MAY-03


JOINS
RIGHT OUTER JOIN
This type of join returns all rows from the RIGHT-hand table specified in the ON condition and only those rows from the other table where the joined fields are equal (join condition is met).


SQL> select s.supplier_id,s.supplier_name,o.order_id
  2  from suppliers s
  3  right outer join orders o
  4  on s.supplier_id=o.supplier_id;

SUPPLIER_ID SUPPLIER_NAME          ORDER_ID
----------- -------------------- ----------
      10000 IBM                      500125
      10001 Hewlett Packard          500126
      null  null                     200127


LEFT OUTER JOIN
This type of join returns all rows from the LEFT-hand table specified in the ON condition and only those rows from the other table where the joined fields are equal (join condition is met).


SQL> select s.supplier_id,s.supplier_name,o.order_id
  2  from suppliers s
  3  left outer join orders o
  4  on s.supplier_id=o.supplier_id;

SUPPLIER_ID SUPPLIER_NAME          ORDER_ID
----------- -------------------- ----------
      10000 IBM                      500125
      10001 Hewlett Packard          500126
      10002 Microsoft                null
      10003 NVIDIA                   null  
      10005 CYBAGE                   null 
      10007 HDFC                     null

6 rows selected.


INNER JOIN
It is the most common type of join. Oracle INNER JOINS return all rows from multiple tables where the join condition is met.


SQL> select s.supplier_id,s.supplier_name,o.order_id
  2  from suppliers s
  3  inner join orders o
  4  on s.supplier_id=o.supplier_id;

SUPPLIER_ID SUPPLIER_NAME          ORDER_ID
----------- -------------------- ----------
      10000 IBM                      500125
      10001 Hewlett Packard          500126


FULL OUTER JOIN
This type of join returns all rows from the LEFT-hand table and RIGHT-hand table with nulls in place where the join condition is not met.


SQL> select s.supplier_id,s.supplier_name,o.order_id
  2  from suppliers s
  3  full outer join orders o
  4  on s.supplier_id=o.supplier_id;

SUPPLIER_ID SUPPLIER_NAME          ORDER_ID
----------- -------------------- ----------
      10000 IBM                      500125
      10001 Hewlett Packard          500126
      10002 Microsoft                null  
      10003 NVIDIA                   null
      10005 CYBAGE                   null
      10007 HDFC                     null
      null  null                     200127

7 rows selected.


MATERIALIZED VIEW

IF WE NEED TO UPDATE/INSERT THE DATA OF MATERIALIZED VIEW THEN USE "FOR UPDATE" KEYWORDS.
Oracle materialized views are one of the single most important SQL tuning tools and they are a true silver bullet, allowing you to pre-join complex views and pre-compute summaries for super-fast response time.   
Oracle materialized views perform miracles in our goal to reduce repetitive I/O.
Without Oracle materialized views you may see unnecessary repeating large-table full-table scans, as summaries are computed, over and over:
   

SQL> create materialized view mv_sup for update as select * from suppliers;

Materialized view created.


SQL> select * from mv_sup;

SUPPLIER_ID SUPPLIER_NAME
----------- --------------------
      10000 IBM
      10001 Hewlett Packard
      10002 Microsoft
      10003 NVIDIA
      10005 CYBAGE


SQL> insert into mv_sup values(10006,'ATOS');

1 row created.


BELOW OUTPUT SHOWS ONLY DATA IN MATERIALIZED VIEW GOT UPDATED BUT NOT ACTUAL TABLE.

SQL> select * from mv_sup;

SUPPLIER_ID SUPPLIER_NAME
----------- --------------------
      10000 IBM
      10001 Hewlett Packard
      10002 Microsoft
      10003 NVIDIA
      10005 CYBAGE
      10006 ATOS

6 rows selected.


SQL> select * from suppliers;

SUPPLIER_ID SUPPLIER_NAME
----------- --------------------
      10000 IBM
      10001 Hewlett Packard
      10002 Microsoft
      10003 NVIDIA
      10005 CYBAGE


NOW WE INSERT DATA INTO ACTUAL TABLE BUT IT WILL NOT REFLECT DIRECTLY TO MATERIALIZED VIEW UNTIL & UNLESS WE WILL REFRESH THE MATERIALIZED VIEW MANUALLY.
BELOW IS ILLUSTRATION- 

SQL> insert into suppliers values(10007,'HDFC');

1 row created.

SQL> commit;

Commit complete.


SQL> select * from mv_sup;

SUPPLIER_ID SUPPLIER_NAME
----------- --------------------
      10000 IBM
      10001 Hewlett Packard
      10002 Microsoft
      10003 NVIDIA
      10005 CYBAGE
      10006 ATOS

6 rows selected.


SQL> select * from suppliers;

SUPPLIER_ID SUPPLIER_NAME
----------- --------------------
      10000 IBM
      10001 Hewlett Packard
      10002 Microsoft
      10003 NVIDIA
      10005 CYBAGE
      10007 HDFC


SQL> exec dbms_mview.refresh('mv_sup');

PL/SQL procedure successfully completed.

SQL> select * from mv_sup;

SUPPLIER_ID SUPPLIER_NAME
----------- --------------------
      10000 IBM
      10001 Hewlett Packard
      10002 Microsoft
      10003 NVIDIA
      10005 CYBAGE
      10007 HDFC

6 rows selected.


VIEW

An Oracle VIEW, in essence, is a virtual table that does not physically exist. Rather, it is created by a query joining one or more tables.

SQL> CREATE OR REPLACE VIEW SUP1 AS SELECT * FROM SUPPLIERS;

View created.

SQL> SELECT * FROM SUP1;

SUPPLIER_ID SUPPLIER_NAME
----------- --------------------
      10000 IBM
      10001 Hewlett Packard
      10002 Microsoft
      10003 NVIDIA
      10005 CYBAGE
      10007 HDFC

6 rows selected.

NOW INSERT DATA INTO VIEW WILL GET AUTOMATICALLY UPDATED TO ACTUAL TABLE.


SQL> INSERT INTO SUP1 VALUES(10008,'ICICI');

1 row created.

SQL> SELECT * FROM SUP1;

SUPPLIER_ID SUPPLIER_NAME
----------- --------------------
      10000 IBM
      10001 Hewlett Packard
      10002 Microsoft
      10003 NVIDIA
      10005 CYBAGE
      10007 HDFC
      10008 ICICI

7 rows selected.

SQL> SELECT * FROM SUPPLIERS;

SUPPLIER_ID SUPPLIER_NAME
----------- --------------------
      10000 IBM
      10001 Hewlett Packard
      10002 Microsoft
      10003 NVIDIA
      10005 CYBAGE
      10007 HDFC
      10008 ICICI

7 rows selected.


SQL> SELECT * FROM MV_SUP;

SUPPLIER_ID SUPPLIER_NAME
----------- --------------------
      10000 IBM
      10001 Hewlett Packard
      10002 Microsoft
      10003 NVIDIA
      10005 CYBAGE
      10007 HDFC

6 rows selected.

SQL>  exec dbms_mview.refresh('mv_sup');

PL/SQL procedure successfully completed.

SQL> SELECT * FROM MV_SUP;

SUPPLIER_ID SUPPLIER_NAME
----------- --------------------
      10000 IBM
      10001 Hewlett Packard
      10002 Microsoft
      10003 NVIDIA
      10005 CYBAGE
      10007 HDFC
      10008 ICICI

7 rows selected.

Thursday 11 December 2014

What is Cloud Computing?

The simple definition: It’s a style of computing based on shared, elastic resources delivered to users in a self-service, metered manner using web technologies. Yet, if you ask five people “what is cloud computing?” you can expect five different answers. Why? Because what matters to them is not what cloud computing is, but what it does for them.

To fully understand cloud computing across an enterprise, you need to understand the different functional benefits driving cloud’s popularity. Let’s look at cloud through the lens of different roles in an enterprise, and then think about how to craft a cohesive cloud strategy that works for everyone in the enterprise. Let’s start with these important roles.
Business Leaders
This group wants cloud for modern, personalized applications. In the digital economy, companies must execute in real-time, from providing customer experiences to building talent-centric HCM strategies. Your customers want to seamlessly interact with their brand, wherever and whenever they want on social media, mobile, in-store, through the call center, on your website, and when making a purchase online. Speed, integrated processes, and analytics are vital. For these people, cloud often means SaaS-based applications that are fast, simple, and give the business side more control.
IT Leaders
IT also sees enormous value in the cloud, particularly in the application and platform services that let internal IT groups offload technology management. CIOs cannot forget existing infrastructure requirements when they evaluate cloud computing, and cloud services such as PaaS and IaaS can help them integrate applications and create consistent workflows across multiple systems—both on premises and in the cloud—while maintaining security and performance. As a result, IT can move away from technology administration and concentrate on business innovation.
Cloud Builders
Private cloud deployment is booming, as companies see the benefits of faster provisioning, on demand access, and scalability. Cloud builders can help their IT department become agile, cost-efficient private cloud providers. They view cloud from a lifecycle management perspective, from resource management and monitoring to capacity planning and chargeback mechanisms.
Developers
For this group, moving development and testing environments to PaaS platforms allows them to cut significant time from the development cycle by removing management tasks, cutting complexity, and increasing developer productivity.
Total Cloud
The key then is to build a cloud strategy that helps every group define not only what cloud computing means to them, but also how to best use it.
The best use might be to build a cloud behind your firewall. Or it could be to subscribe to cloud applications and compute services from a trusted cloud vendor. Another option is to use infrastructure or application that is dedicated to your organization but hosted by a vendor or a local partner.
Most likely, you’ll be using several of the above of the above scenarios at once. So it makes sense to choose a cloud provider with solutions that are preintegrated and tested to work across the entire stack, whether in your data center or in the cloud. That way, even though cloud computing means different things to different people, you will have a single, complete, and integrated platform to serve them all.


Your Oracle Database in the Cloud
Oracle Database Cloud Services gives you the power and flexibility of the Oracle Database in the cloud.  You choose whether you want a dedicated database instance with direct network connections and full administrative control, or a dedicated schema with a full development and deployment platform managed by Oracle.
 
 
Secured, protected, elastic cloud storage for Oracle database backups
Oracle Database Backup Service is the cloud storage solution for all your Oracle Database backup needs. It offers reliable and scalable object storage solution for storing and accessing your ever growing Oracle database backup data. 


Joins

A join is a query that combines rows from two or more tables, views, or materialized views. Oracle Database performs a join whenever multiple tables appear in the FROM clause of the query. The select list of the query can select any columns from any of these tables. If any two of these tables have a column name in common, then you must qualify all references to these columns throughout the query with table names to avoid ambiguity.

Join Conditions

Most join queries contain at least one join condition, either in the FROM clause or in the WHERE clause. The join condition compares two columns, each from a different table. To execute a join, Oracle Database combines pairs of rows, each containing one row from each table, for which the join condition evaluates to TRUE. The columns in the join conditions need not also appear in the select list.
To execute a join of three or more tables, Oracle first joins two of the tables based on the join conditions comparing their columns and then joins the result to another table based on join conditions containing columns of the joined tables and the new table. Oracle continues this process until all tables are joined into the result. The optimizer determines the order in which Oracle joins tables based on the join conditions, indexes on the tables, and, any available statistics for the tables.
IA WHERE clause that contains a join condition can also contain other conditions that refer to columns of only one table. These conditions can further restrict the rows returned by the join query.
Note:
You cannot specify LOB columns in the WHERE clause if the WHERE clause contains the join condition. The use of LOBs in WHERE clauses is also subject to other restrictions. See Oracle Database SecureFiles and Large Objects Developer's Guide for more information.

Equijoins

An equijoin is a join with a join condition containing an equality operator. An equijoin combines rows that have equivalent values for the specified columns. Depending on the internal algorithm the optimizer chooses to execute the join, the total size of the columns in the equijoin condition in a single table may be limited to the size of a data block minus some overhead. The size of a data block is specified by the initialization parameter DB_BLOCK_SIZE.

Self Joins

A self join is a join of a table to itself. This table appears twice in the FROM clause and is followed by table aliases that qualify column names in the join condition. To perform a self join, Oracle Database combines and returns rows of the table that satisfy the join condition.

Cartesian Products

If two tables in a join query have no join condition, then Oracle Database returns their Cartesian product. Oracle combines each row of one table with each row of the other. A Cartesian product always generates many rows and is rarely useful. For example, the Cartesian product of two tables, each with 100 rows, has 10,000 rows. Always include a join condition unless you specifically need a Cartesian product. If a query joins three or more tables and you do not specify a join condition for a specific pair, then the optimizer may choose a join order that avoids producing an intermediate Cartesian product.

Inner Joins

An inner join (sometimes called a simple join) is a join of two or more tables that returns only those rows that satisfy the join condition.

Outer Joins

An outer join extends the result of a simple join. An outer join returns all rows that satisfy the join condition and also returns some or all of those rows from one table for which no rows from the other satisfy the join condition.
  • To write a query that performs an outer join of tables A and B and returns all rows from A (a left outer join), use the LEFT [OUTER] JOIN syntax in the FROM clause, or apply the outer join operator (+) to all columns of B in the join condition in the WHERE clause. For all rows in A that have no matching rows in B, Oracle Database returns null for any select list expressions containing columns of B.
  • To write a query that performs an outer join of tables A and B and returns all rows from B (a right outer join), use the RIGHT [OUTER] JOIN syntax in the FROM clause, or apply the outer join operator (+) to all columns of A in the join condition in the WHERE clause. For all rows in B that have no matching rows in A, Oracle returns null for any select list expressions containing columns of A.
  • To write a query that performs an outer join and returns all rows from A and B, extended with nulls if they do not satisfy the join condition (a full outer join), use the FULL [OUTER] JOIN syntax in the FROM clause.
You cannot compare a column with a subquery in the WHERE clause of any outer join, regardless which form you specify.
You can use outer joins to fill gaps in sparse data. Such a join is called a partitioned outer join and is formed using the query_partition_clause of the join_clause syntax. Sparse data is data that does not have rows for all possible values of a dimension such as time or department. For example, tables of sales data typically do not have rows for products that had no sales on a given date. Filling data gaps is useful in situations where data sparsity complicates analytic computation or where some data might be missed if the sparse data is queried directly.
See Also:
Oracle recommends that you use the FROM clause OUTER JOIN syntax rather than the Oracle join operator. Outer join queries that use the Oracle join operator (+) are subject to the following rules and restrictions, which do not apply to the FROM clause OUTER JOIN syntax:
  • You cannot specify the (+) operator in a query block that also contains FROM clause join syntax.
  • The (+) operator can appear only in the WHERE clause or, in the context of left-correlation (when specifying the TABLE clause) in the FROM clause, and can be applied only to a column of a table or view.
  • If A and B are joined by multiple join conditions, then you must use the (+) operator in all of these conditions. If you do not, then Oracle Database will return only the rows resulting from a simple join, but without a warning or error to advise you that you do not have the results of an outer join.
  • The (+) operator does not produce an outer join if you specify one table in the outer query and the other table in an inner query.
  • You cannot use the (+) operator to outer-join a table to itself, although self joins are valid. For example, the following statement is not valid:
    -- The following statement is not valid:
    SELECT employee_id, manager_id 
       FROM employees
       WHERE employees.manager_id(+) = employees.employee_id;
    
    However, the following self join is valid:
    SELECT e1.employee_id, e1.manager_id, e2.employee_id
       FROM employees e1, employees e2
       WHERE e1.manager_id(+) = e2.employee_id
       ORDER BY e1.employee_id, e1.manager_id, e2.employee_id;
    
  • The (+) operator can be applied only to a column, not to an arbitrary expression. However, an arbitrary expression can contain one or more columns marked with the (+) operator.
  • A WHERE condition containing the (+) operator cannot be combined with another condition using the OR logical operator.
  • A WHERE condition cannot use the IN comparison condition to compare a column marked with the (+) operator with an expression.
If the WHERE clause contains a condition that compares a column from table B with a constant, then the (+) operator must be applied to the column so that Oracle returns the rows from table A for which it has generated nulls for this column. Otherwise Oracle returns only the results of a simple join.
In a query that performs outer joins of more than two pairs of tables, a single table can be the null-generated table for only one other table. For this reason, you cannot apply the (+) operator to columns of B in the join condition for A and B and the join condition for B and C. Refer to SELECT for the syntax for an outer join.

Antijoins

An antijoin returns rows from the left side of the predicate for which there are no corresponding rows on the right side of the predicate. It returns rows that fail to match (NOT IN) the subquery on the right side.

Semijoins

A semijoin returns rows that match an EXISTS subquery without duplicating rows from the left side of the predicate when multiple rows on the right side satisfy the criteria of the subquery.
Semijoin and antijoin transformation cannot be done if the subquery is on an OR branch of the WHERE clause.


Also refer - http://www.oracle-developer.net/display.php?id=213
 

Oracle/PLSQL: Joins

Description

Oracle JOINS are used to retrieve data from multiple tables. An Oracle JOIN is performed whenever two or more tables are joined in a SQL statement.
There are 4 different types of Oracle joins:
  • Oracle INNER JOIN (or sometimes called simple join)
  • Oracle LEFT OUTER JOIN (or sometimes called LEFT JOIN)
  • Oracle RIGHT OUTER JOIN (or sometimes called RIGHT JOIN)
  • Oracle FULL OUTER JOIN (or sometimes called FULL JOIN)

INNER JOIN (simple join)

Chances are, you've already written a statement that uses an Oracle INNER JOIN. It is the most common type of join. Oracle INNER JOINS return all rows from multiple tables where the join condition is met.

Syntax

The syntax for the Oracle INNER JOIN is:
SELECT columns
FROM table1 
INNER JOIN table2
ON table1.column = table2.column;


LEFT OUTER JOIN

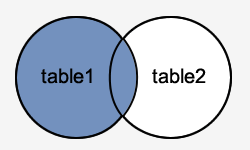
Another type of join is called an Oracle LEFT OUTER JOIN. This type of join returns all rows from the LEFT-hand table specified in the ON condition and only those rows from the other table where the joined fields are equal (join condition is met).

Syntax

The syntax for the Oracle LEFT OUTER JOIN is:
SELECT columns FROM table1 LEFT [OUTER] JOIN table2 ON table1.column = table2.column;


RIGHT OUTER JOIN

Another type of join is called an Oracle RIGHT OUTER JOIN. This type of join returns all rows from the RIGHT-hand table specified in the ON condition and only those rows from the other table where the joined fields are equal (join condition is met).

Syntax

The syntax for the Oracle RIGHT OUTER JOIN is:
SELECT columns
FROM table1
RIGHT [OUTER] JOIN table2
ON table1.column = table2.column;


FULL OUTER JOIN

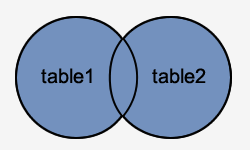
Another type of join is called an Oracle FULL OUTER JOIN. This type of join returns all rows from the LEFT-hand table and RIGHT-hand table with nulls in place where the join condition is not met.

Syntax

The syntax for the Oracle FULL OUTER JOIN is:
SELECT columns FROM table1 FULL [OUTER] JOIN table2 ON table1.column = table2.column;


Refer link for more details - http://www.techonthenet.com/oracle/joins.php