Some of the Oracle Data Guard related questions are listed below.
Q 1
What is data guard in simple language?
A 1
Your primary database is running and you want to reduce downtime because of unplanned outages. You create a replica of this primary database (termed as standby database).
You regularly ship redo generated in the primary database to standby database and apply it there. So that is our ‘Data Guard’ standby database and it is in a continuous state of recovery, validating and applying redo to remain in sync with the primary database.
Q 2
Your standby database was out of reach because of network issue. How will you synchronize it with primary database again?
A 2
Data Guard automatically resynchronizes the standby following network or standby outages using redo data that has been archived at the primary.
Q 3
What is Redo Transport Services (RTS)?
A 3
This process takes care of the transmission of redo from a primary database to the standby database.
Below is how Redo Transport Services (RTS) works:
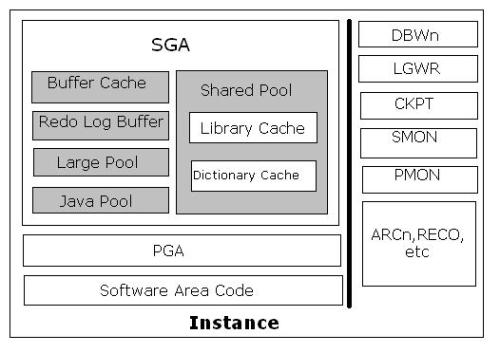
1) Log Network Server (LNS) reads redo information from the redo buffer in SGA of PRIMARY Database
2) Log Network Server (LNS) passes redo to Oracle Net Services for transmission to the STANDBY database
3) Remote File Server (RFS) records the redo information transmitted by the LNS at the STANDBY database
4) Remote File Server (RFS) writes it to a sequential file called a standby redo log file (SRL) at the STANDBY database
** For multi-standby configuration, the primary database has a separate LNS process for each standby database.
** Two redo transport methods are supported with the LNS process: synchronous (SYNC) or asynchronous (ASYNC).
Q 4
What is the difference between SYNC and ASYNC redo transport method?
A 4
Synchronous transport (SYNC)
Also known as a “zero data loss” redo transport menthod.
Below is how it works:
1) Log Network Server (LNS) reads redo information from the redo buffer in SGA of PRIMARY Database
2) Log Network Server (LNS) passes redo to Oracle Net Services for transmission to the STANDBY database
3) Remote File Server (RFS) records the redo information transmitted by the LNS at the STANDBY database
4) Remote File Server (RFS) writes it to a sequential file called a standby redo log file (SRL) at the STANDBY database
5) Remote File Server (RFS) transmits an acknowledgement back to the LNS process on the primary database
6) Log Network Server (LNS) notifies the LGWR that transmission is complete on the primary database.
7) Log Writer (LGWR) acknowledges the commit to the user.
Asynchronous transport (ASYNC)
Unlike SYNC, Asynchronous transport (ASYNC) eliminates the requirement that the LGWR wait for acknowledgement from the LNS. This removes the performance impact on the
primary database irrespective of the distance between primary and standby locations.
So if the LNS is unable to keep pace and the log buffer is recycled before the redo can be transmitted to the standby, the LNS automatically transitions to reading and sending from the Online Redo logs. Once the LNS is caught up, it automatically transitions back to reading & sending directly from the log buffer.
Below is how it works:
1) Log Network Server (LNS) reads redo information from the redo buffer in SGA of PRIMARY Database
2) Log Network Server (LNS) passes redo to Oracle Net Services for transmission to the STANDBY database
3) Remote File Server (RFS) records the redo information transmitted by the LNS at the STANDBY database
4) Remote File Server (RFS) writes it to a sequential file called a standby redo log file (SRL) at the STANDBY database
so step 5, 6 & 7 as discussed above for SYNC are not applicable here.
The only drawback of ASYNC is the increased potential for data loss. Say a failure destroyed the primary database before any transport lag was reduced to zero, this means any committed transactions that were a part of the transport lag will be lost. So it is highly advisable to have enough network bandwidth to handle peak redo
generation rates when using ASYNC method.
Q 5
How Synchronous transport (SYNC) can impact the primary database performance?
A 5
SYNC guarantees protection for every transaction that the database acknowledges as having been committed but at the same time LGWR must wait for confirmation that data is protected at the standby before it can proceed with the next transaction. It can impact primary database performance and it depends on factors like
> the amount of redo information to be written
> available network bandwidth
> round-trip network latency (RTT)
> standby I/O performance writing to the SRL.
> distance betweeen primary and standby databases as network RTT increases with distance.
Q 6
What is Data Guard’s Automatic Gap Resolution?
A 6
Your database is using ASYNC transport method and the instance load is at the peak. The LNS is unable to keep pace and the log buffer is recycled before the redo can be transmitted to the standby, the LNS automatically transitions to reading and sending from the Online Redo logs. Once the LNS is caught up, it automatically transitions back to reading & sending directly from the log buffer.
Now in some cases there can be two or more log switches before the LNS has completed sending the redo information from online redo log files and in meantime if any such required online redo log files were archived then those redo information will be transmitted via Data Guard’s gap resolution process “Automatic Gap Resolution”.
OR
In some other case when your network or the standby database is down and your primary system is one busy system, so before the connection between the primary and standby is restored, a large log file gap will be formed.
Automatic Gap Resolution will take care of such scenarios by following below action plan:
1) ARCH process on the primary database continuously ping the standby database during the outage to determine its status.
2) As soon as the standby is restored, the ARCH ping process queries the standby control file (via its RFS process) to determine the last complete log file that the standby received from the primary database.
3) Data Guard determines which log files are required to resynchronize the standby database and immediately begins transmitting them using additional ARCH processes.
4) LNS process at primary database will also attempt and succeed in making a connection to the standby database and will begin transmitting current redo. So first all the ARCH files are applied and then current redo log.
The Data Guard architecture enables gaps to be resolved quickly using multiple background ARCH processes
Q 7
What is the difference between Physical standby and Logical standby database?
A 7
Data Guard Apply process in standby database can apply redo information directly and in that case it will be called physical standby.
OR It can apply SQL and in that case it will be called Logical standby.
Physical Standby:
In this case standby database is an exact, block-by-block, physical replica of the primary database.
The change vectors received by RFS process are directly applied to the standby database by using media recovery.so here the apply process read data blocks, assemble redo changes from mappings, and then apply redo changes to data blocks directly.
Physical Standby is the best choice for disaster recovery (DR) based upon their simplicity, transparency, high performance, and good data protection.
Logical Standby:
In this case standby database uses SQL Apply method to “mine” the redo by converting it to logical change records, and then building SQL
transactions and applying SQL to the standby database.
As this process of replaying the workload is more complex than the Physical Standby’s process, so it requires more memory, CPU, and I/O.
One good advantage here is that a logical standby database can be opened read-write while SQL Apply is active which means you can update (create/insert/delete etc) local tables and schemas in the logical standby database.
Q 8
How is Data Guard Apply process works if primary and secondary database involves Oracle RAC?
A 8
If Primary database is RAC but standby is Non-RAC:
Each primary Oracle RAC instance ships its own thread of redo that is merged by the Data Guard apply process at the standby and applied in SCN order to the standby database.
If both Primary and standby databases are RAC:
If the standby is also an Oracle RAC database, only one instance (the apply instance) will merge and apply changes to the standby database. If the apply instance fail for any reason, the apply process will automatically failover to a surviving instance in the Oracle RAC standby database when using the Data Guard broker.
Q 9
What is Active Data Guard Option (Oracle Database 11g Enterprise Edition)?
A 9
For physical standby database, prior to 11g, the database would have to be in the mount state when media recovery was active which means you were not able to query the standby database during media recovery stage as there was no read-consistent view.
Active Data Guard 11g features solves the read consistency problem by use of a “query” SCN. The media recovery process on the standby database will advance the query SCN after all the changes in a transaction have been applied . The query SCN will appear to user as the CURRENT_SCN column in the V$DATABASE view on the standby database. So Read-only users will only be able to see data up to the query SCN, and hence guaranteeing the same read consistency as the primary database.
This enables a physical standby database to be open as read-only while media recovery is active, making it useful for doing read-only workloads.
Also, if you need read-write access to the standby database, you can use SQL Apply method of dataguard.
Q 10
What are the important database parameters related to Data Guard corruption prevention?
A 10
On the primary database:
a) DB_ULTRA_SAFE
Values can be DATA_AND_INDEX or DATA_ONLY. Setting DB_ULTRA_SAFE at the primary will also automatically set DB_ LOST_WRITE_PROTECT=TYPICAL on the primary database.
In Oracle Database 11g Release 2 (11.2), the primary database automatically attempts to repair the corrupted block in real time by fetching a good version of the same block from a physical standby database.
On the standby database:
a) DB_BLOCK_CHECKSUM=FULL
DB_BLOCK_CHECKSUM detects redo and data block corruptions and detect corruptions on the primary database and protect the standby database. This parameter requires minimal CPU resources.
b) DB_LOST_WRITE_PROTECT=TYPICAL
A lost write can occur when an I/O subsystem acknowledges the completion of a write, while in fact the write did not occur in persistent storage.
This will create a stale version of the data block. When the DB_LOST_WRITE_PROTECT initialization parameter is set, the database records buffer cache block reads in the redo log, and this information is used to detect lost writes.
You set DB_LOST_WRITE_PROTECT to TYPICAL in both primary and standby databases.
Q 11
What are different Data Guard protection modes?
A 11
Data Guard protection modes implement rules that controls how the configuration will respond to failures, enabling you to achieve specific objectives for data protection, availability, and performance.
a) Maximum Performance
– emphasis is on primary database performance over data protection.
– requires ASYNC (the default method) redo transport so that the LGWR process never waits for acknowledgment from the standby database.
– network connection between primary and standby OR the availability of the standby database DO NOT IMPACT the primary database performance
b) Maximum Availability
– first emphasis is on availability and second priority is zero data loss protection.
– requires SYNC redo transport so primary database performance may be impacted in waiting for acknowledgment from the standby (it doesn’t mean indefinite wait in case standby database fails, maximum wait will be equal to parameter NET_TIMEOUT seconds).
c) Maximum Protection
– utmost priority is on data protection.
– also requires SYNC redo transport.
– unlike ‘Maximum Availability’ it does not consider the NET_TIMEOUT parameter, which means If the primary does not receive acknowledgment from a SYNC standby database, it will stall primary and eventually abort it, preventing any unprotected commits from occurring.
– highly recommended to use a minimum of two SYNC standby databases at different locations if using ‘Maximum Protection’ to have high availability of primary database.
Q 12
What is Switchover event?
A 12
Switchover is useful for minimizing downtime during planned maintenance. It is a planned event in which Data Guard reverses the roles of the primary and a standby database.
The primary database runs unaffected while we are making the required changes on our standby database (e.g. patchset upgrades, full Oracle version upgrades, etc).
Once changes are complete, production is switched over to the standby site running at the new release.
This means regardless of how much time is required to perform planned maintenance, the only production database downtime is the time required to execute a switchover, which can be less than 60 seconds
Below operations happens when switchover command is executed:
1. primary database is notified that a switchover is about to occur.
2. all users are disconnected from the primary.
3. a special redo record is generated that signals the End Of Redo (EOR).
4. primary database is converted into a standby database.
5. the final EOR record is applied to standby database, this guarantees that no data has been lost, and it converts the standby to the primary role.
Q 13
What is Failover event?
A 13
The Failover process is similar to switchover event except that the primary database never has the chance to write an EOR record as this is an unplanned event.
Whether or not a failover results in data loss depends upon the Data Guard protection mode:
a) Maximum Protection >> No Data Loss
b) Maximum Availability >> No Data Loss (except when there was a previous failure (e.g. a network failure) that had INTERRUPTED REDO TRANSPORT and allowed the primary database to move ahead of standby)
c) Maximum Performance (ASYNC) >> may lose any committed transactions that were not transmitted to the standby database before the primary database failed.
Failover event can be of two types:
1) Manual
Administrator have complete control of primary-standby role transitions. It can lengthen the outage by the amount of time required for the administrator to be notified and manual execution of command.
2) Automatic
It uses Data Guard’s Fast-Start Failover feature which automatically detects the failure, evaluates the status of the Data Guard configuration, and, if appropriate, executes the failover to a previously chosen standby database.
Q 14
Which tools can be used for Data Guard Management?
A 14
1) SQL*Plus – traditional method, can prove most tedious to use
2) Data Guard broker – automates and centralizes the creation, maintenance, and monitoring of a Data Guard configuration. Simplifies and automates many administrative
tasks. It has its own command line (DGMGRL) and syntax.
3) Enterprise Manager – requires that the Data Guard broker be enabled. a GUI to the Data Guard broker, replacing the DGMGRL command line and interfacing directly with the broker’s monitor processes.
Q 15
What is Data Guard 11g snapshot standby?
A 15
With 11g, you can thoroughly test your changes on a true replica of your production system and database using actual production workload.
Data Guard 11g physical standby can now be converted to a snapshot standby, independent of the primary database, that is open read-write and able to be used for preproduction testing. It uses Flashback Database and sets a guaranteed restore point (GRP) at the SCN before the standby was open read-write.
NOTE: Primary database redo continues to be shipped to a snapshot standby, and while not applied, it is archived for later use.
You can convert this snapshot database back into a synchronized physical standby database when testing is complete. Redo Apply process at standby will take care that all
primary database redo archived while a snapshot standby is applied until it is caught up with the primary database.
Q 16
What is the difference between Recovery Point Objective(RPO) and Recovery Time Objective (RTO)?
A 16
A) Recovery Point Objective(RPO)
RPO concerns with data. It is the amount of data you are willing to lose when the failure occurs in your database system. Usually people define data loss in terms of time, so possible values can be 5 seconds of data loss, 2 hours of data loss etc.
Remember that each standby database has its own set of attributes and parameters. It means you can mix zero data loss standby databases with minimal data loss standby
databases in the same Data Guard configuration
If you have decided that you want to implement zero data loss strategy, then you should really focus on Networks and Data Loss
B) Recovery Time Objective (RTO)
RTO is defined as how fast you can get back up and running (whereas RPO is concerned with data loss)
So with your RPO strategy you lost say only about 6 seconds of data as you committed to your client but with RTO you need to formulate how fast clients can connect back to the database system after the data loss has occurred.
Q 17
What are Standby Redo Log (SRL) files?
A 17
The SRL files are where the Remote File Server (RFS) process at your standby database writes the incoming redo so that it is persistent on disk for recovery. SRL files are important for better redo transport performance and data protection.
SRL are MUST in Maximum Availability or Maximum Protection mode and OPTIONAL (but recommended) in Maximum Performance mode.
If there are no Standby Redo Log (SRL) files, then at each log switch in the primary database, the RFS process on the standby database that is serving an asynchronous standby destination has to create an archive log of the right size. While the RFS is busy doing creating the archive log file, the LNS process at the primary database has to wait, getting further and further behind the LGWR (in case of Maximum Performance mode). That is why it recommended to have Standby Redo Log (SRL) files in Maximum Performance mode also.
We generally configure them on our primary database as well in preparation for a role transition b/w primary-standby.
Also, do not multiplex SRLs. Since Data Guard will immediately request a new copy of the archive log if an SRL file fails, there is no real need to have more than one copy of each.
Q 18
What is Fast Start Fail Over (FSFO)?
A 18
Main criticism of Oracle standby databases has always been that too much manual interaction is required in case of disaster situation. FSFO helps in filling up this requirement. FSFO quickly and reliably fails over the target standby database to the primary database role, without requiring you to perform any manual steps to invoke the failover. Please keep in mind that you need to have Broker configuration done to be able to use FSFO feature.
Q 19
What is the concept of OBSERVER in Fast Start Fail Over ( FSFO)?
A 19
In normal scenario, If you have to perform a switch over activity in your standby setup you keep some kind of monitor/observation on your setup so that you are aware that when your primary database is not available and you need to switch over to standby database. Oracle helped in getting this manual observation activity by providing an OBSERVER process which constantly monitors the availability of the Primary database. Now, if we run OBSERVER on the primary or secondary database server itself then their is risk that the OBSERVER itself will get down when that server is down because of disaster. That is why observer is a separate OCI client-side component that runs on a different computer from the primary and standby databases.
So Once the observer is started, no further user interaction is required. If both the observer and designated standby database lose connectivity with the primary database for longer than the number of seconds specified by the FastStartFailoverThreshold configuration property, the observer will initiate a fast-start failover to the standby database.
Q 20
What are the high level steps for configuring Fast Start Fail Over (FSFO)?
A20
To configure FSFO in your Standby setup, broad level steps will be:
STEP 1: Determine Which of the Available Standby Databases is the Best Target for the Failover. Means you want to choose physical over logical etc.
STEP 2: Specify the Target Standby Database with the FastStartFailoverTarget Configuration Property. This may not be required if you have only one standby database in configuration.
STEP 3: Determine the Protection Mode You Want . You will have to choose from either maximum performance or maximum availability. This is more of business decision and you will have to take consensus from all stakeholders on which mode will prove right for you.
STEP 4: Set the FastStartFailoverThreshold Configuration Property. This parameter tells how long (in seconds) OBSERVER process should wait before starting failover
STEP 5: Set Other Properties Related to Fast-Start Failover (Optional). There are some other parameters like FastStartFailoverAutoReinstate, ObserverOverride etc which can also be applicable to meet your specific requirements.
STEP 6: Enable Additional Fast-Start Failover Conditions (Optional). This step can give you some more options to define when you primary database is unusable example: stuck archiver, corrupt control file etc.
STEP 7: Enable FSFO Using DGMGRL or Cloud Control. This is the main step in which you will enable to FSFO.
STEP 8: Start the Observer. You can use Cloud Control or DGMGRL to start the observer process.
STEP 9: Verify the Fast-Start Failover Environment. DGMGRL command “SHOW FAST_START FAILOVER” can show you easily the status of FSFO.